Your own equipment
The studio supports connecting a personal laptop via USB-C. A laptop can be used to show content like slides or videos in the podcast recording. The USB-C connection can be found on the small table on the host’s left side. Note that screen sharing via the USB-C connection requires a driver software to be installed. For Aalto managed computers search for “DisplayLink Driver” in the Managed Software Center. For non Aalto devices click here to read the install instructions.
Turning on the equipment
When you enter the room there are a couple of switches on your left. Press “Video Lights” to turn on the lights then press “Equipment” to turn on the other studio equipment. The recording computer can be accessed via the KVM station behind the TV screen. The Stream Deck controller can be woken up by pressing the “Wake Up” button in the center. You can find more information about the recording computer and Stream Deck later in this guide.
Cameras
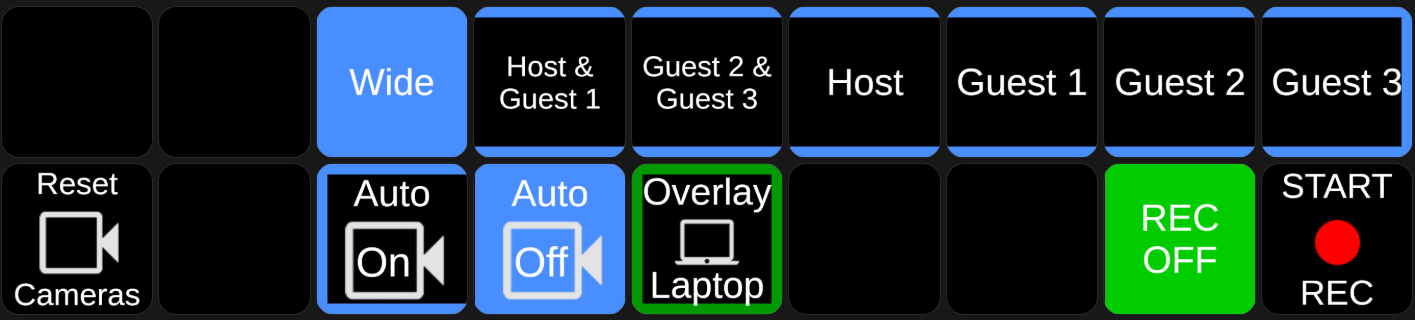
There are three robot cameras which are used to capture different filming angles. The cameras are preset according to the four seating positions. Please do not attempt to move the cameras! You can simply choose the desired image from the Stream Deck or let the autodirector switch cameras automatically according to who is speaking. If the image framing looks off for some reason try pressing the “Reset Cameras” button on the video page of the Stream Deck Controller. If this doesn’t fix the issue please contact one of our technicians for help.
Microphones
The studio can accommodate up to four people. If there are less than four people, the extra microphones can be removed and placed on the black table next to the KVM station. The microphones are attached with short cables to the edge of the podcast table. Simply unplug the cable from the edge of the table and move the whole microphone assembly aside. Do not attempt to remove the cable from the microphone itself!
When speaking to the microphone make sure you bring it as close to your mouth as possible. You can achieve this by adjusting the microphone arm to the desired height. Note that If you lean back on the chair and speak from further away your voice will become really quiet in the recording.
Headphones and Speakers
Headphones can be found on the black table next to the KVM station. The headphones plug into the ports on the sides of the podcast table. Each participant has their own headphone jack to plug their headphones into. The volume can be adjusted for each participant independently using the small mixer under the table on the host’s left side. Headphones are not mandatory to use but they can be helpful to judge how close to the microphone you need to speak for appropriate volume. A good practice is to at least check the audio levels first using the headphones before starting the actual recording.
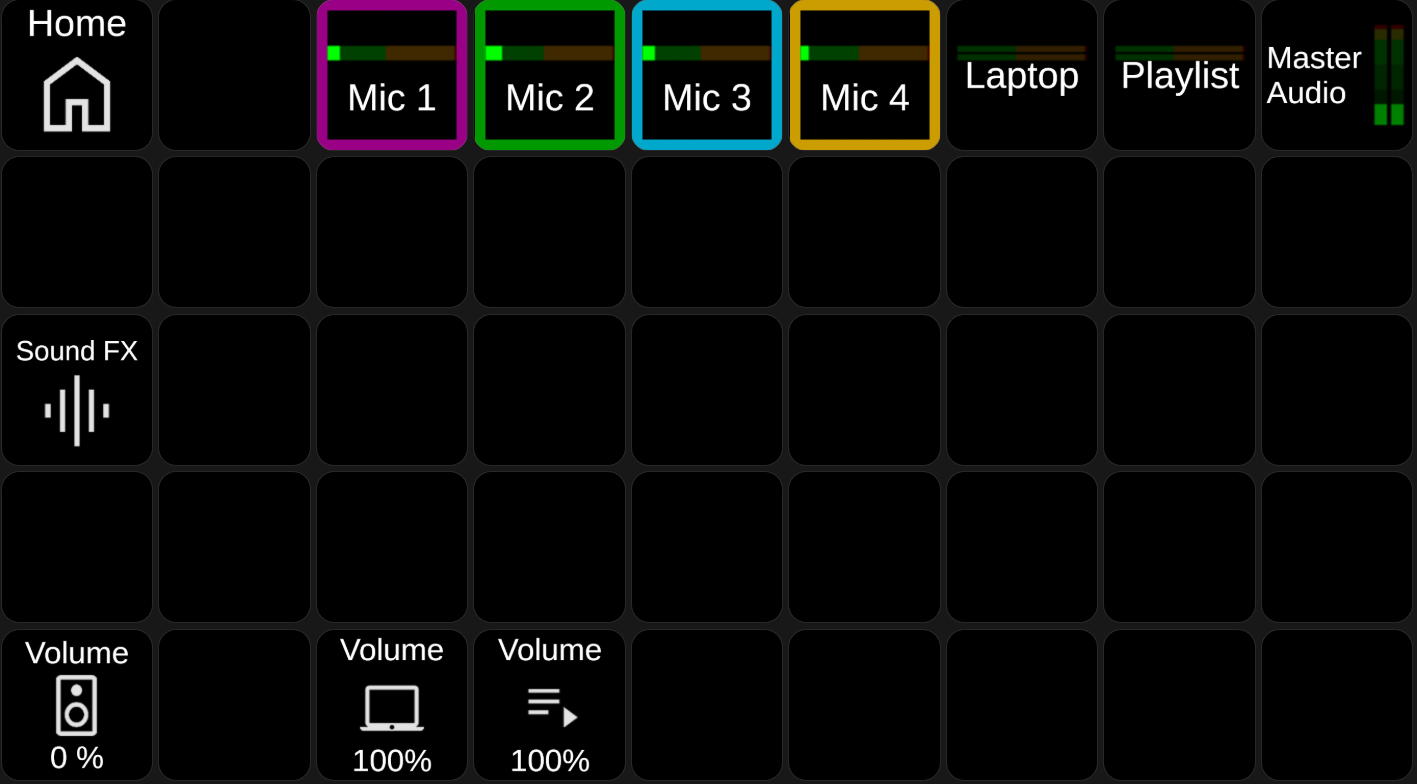
Speakers can be used instead of the headphones if desired. The speakers are located on the sides of the TV. To enable the speakers head to the audio page on the Stream Deck controller and adjust the knob labeled “speakers”. Clicking on the knob will toggle the speakers on and off.
TV Screen
The TV shows a multiview of the different images you can choose from. The upper right image with the red banner labeled “Output” is the one recorded into the final output video.
Stream Deck Controller
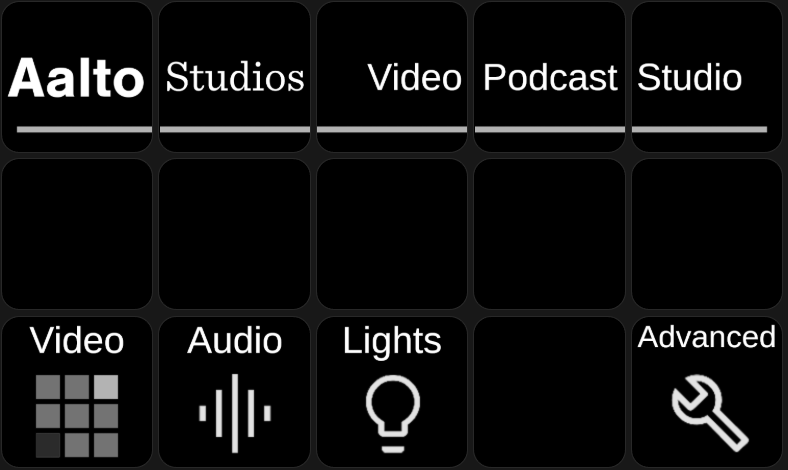
The Stream Deck can be found on the host’s left side. By default it should show the home page. If the Stream Deck has gone to sleep it can be woken up by pressing the “Wake Up” button in the middle. From the home page you can access three main pages including: video, audio and lights. For most use cases you only need to access these three pages. There is also an advanced page for more demanding workflows. Only access the advanced page after you have received training from one of our technicians. The following paragraphs will explain what you can control from each page.
Video Page
Here you can choose which image is shown on the recording. You can also start and stop the recording using the button on the bottom right. The blue “Auto On” and “Auto Off” buttons toggle on and off the “automatic director”. When it’s enabled the software will automatically choose the correct image according to who is speaking. For most podcasts we recommend leaving the autodirector on so that the host can focus fully on the conversation. The green “Overlay Laptop” button puts the laptop screen share over the camera image. Note that the laptop screen is always overlaid on top even if the autodirector is enabled.
Audio Page
On the top of the audio page you can see separate audiometers for each audio source. Adjust the microphone distance so that the audiometer is hitting the yellow zone while speaking. On the bottom of the page you can find controls for the speaker volume as well as volume of the laptop and playlist. Adjusting the knob will increase or decrease the volume. Pressing on the know will mute and unmute the audio. When playing content that includes audio from either a laptop or the playlist, make sure to adjust the volume so that it is hitting the yellow zone on the audiometer.
There is also a button labeled “Sound FX”. It will open a separate page where you can play some sound effects. The volume of these sounds are already set to the correct volume.
Lights Page
Here you can choose the desired look from a selection of lighting presets. The presets change the color of the background lighting to provide a bit more character to your podcast.
KVM Station
Here you can access the recording computer. If the screen is showing a blue and white login prompt please enter the following credentials: Username: VPS, Password: Aalto. Press enter to confirm and then enter again to access the VMIX computer. If the computer is logged out of Windows please login with the following credentials: Username: VMIX, Password: VMIX.
Podcast Recording Workflow
The following will describe a typical recording workflow step by step:
- Start by turning on the video lights and the podcast equipment using the switches near the entrance.
- Head to the KVM station and turn on the monitor. If the computer is logged out, login with the credentials specified earlier.
- Before proceeding further please restart the computer by pressing the windows icon at the bottom left then the power icon and finally press “Restart”. This will ensure all the systems initialize properly after the previous session.
- After the computer restarts login with Username: VMIX, Password: VMIX. Do not login with your Aalto account.
- At this point you can leave the KVM station. Do not change any settings on the programs that were opened on the computer! Everything is controlled via the Stream Deck Controller next to the host’s seat.
- It’s recommended to move aside any unused microphones for a cleaner look. Unused microphones can be placed on black table next to the KVM station.
- If needed, headphones can be obtained from the same table and plugged into the headphone jacks on the sides of the table.
- Check audio levels using headphones and audio meters on the Stream Deck. Adjust the positions of the microphones to achieve the correct speaking volume.
- Make sure the autodirector is on if you prefer automatic camera switching. It can be toggled on and off on the video page of the Stream Deck.
- Press the “Start Rec” button on the video page to start recording. (It will ask for confirmation before starting.)
- Press the “Stop Rec” button in the same location to stop recording. (It will ask for confirmation before stopping.)
- Head back to the KVM station.
- Go to the Windows desktop and open the “Podcast Recordings” folder. Here you will see your podcast named with the timestamp of the recording. Note that there are two different files. One is an audio only .wav file and the other is an .mp4 file with both video and audio.
- You can plug your own storage device into the USB ports under the screen and transfer the video to it. Alternatively, you can upload the podcast to your cloud storage if preferred. Note that this is a public computer so make sure to log out of your personal accounts before leaving!
- After you have made sure your podcast has been successfully transferred off the recording computer please delete the podcast from the computer. Otherwise the next user will be able to access your recordings!
- Do not turn off the computer! Simply press the power button on the monitor to turn it off.
- Before heading out please leave all the equipment as it was when you started and remember to take all your belongings with you.
- Lastly, turn off the equipment and lights from the switches next to the exit.
