This is a document in progress, illustrating the various machinery and furniture of the space, including control surfaces and the lighting. It is made public as it can be of value even in an unfinished form.
Teaching Studio is a novel self-serviced audiovisual production space. It is somewhat related to the Self-service Studio and offers partly similar capabilities. There are not many similarities between the studios, though. Teaching Studio is a new facility and works differently than any other space on the campus.
How The Studio is designed to be used
The studio has two working modes. Self-service mode, for which these instructions are, and production mode, where multiple audiovisual professionals create a multicamera show using all the bells and whistles installed in the studio. Productions using multicamera mode and separate microphones always need to be booked exclusively via communications and comes with a cost.
Self-service mode is a lot simpler, and users can book the space for this use themselves after they have been granted a permit to book the space from Takeout. In self-service mode the studio offers one camera inside the teleprompter and one microphone in the ceiling. These are connected to the computer in the studio.
The heart of the Teaching Studio is the Mac Studio computer. Through the computer you can use all the video screens in the studio, even in self-service mode. You can make a local recording, or stream video and audio to a third-party streaming service, such as Panopto or YouTube.
It might be a good idea to have a friend / colleague with you at least on the first couple of times you are using the Teaching Studio. There are quite a few things to go through, and the computer is away from the stage, so another pair of hands can be quite useful.
What can you do in the Studio
- You can record high quality video and audio in the studio. There is a camera inside the teleprompter and a microphone in the ceiling between the two skybox lights.
- You can create visually interesting programs using the studio technology in conjunction with OBS Studio software.
- There is no speaker system in the studio at the moment.
- There are 4 presets for the video lights, you may choose to use any of them.
- You can use the studio technology with any software available in the Mac – OBS, Panopto, Teams, Zoom, Keynote, PowerPoint…
- There is a clicker available for controlling slides in PowerPoint or Keynote
What in the Studio you can change/adjust
- You can adjust the cameras and teleprompters position to achieve the image wanted.
- You can select what image you want to display on each of the studio’s display surfaces.
- You can adjust the height of the teleprompter so that it’s at a good height for reading and
the camera is approximately at the eye level.
- You can adjust the angle and zoom on the camera with the camera remote.
How to turn devices on and set everything up
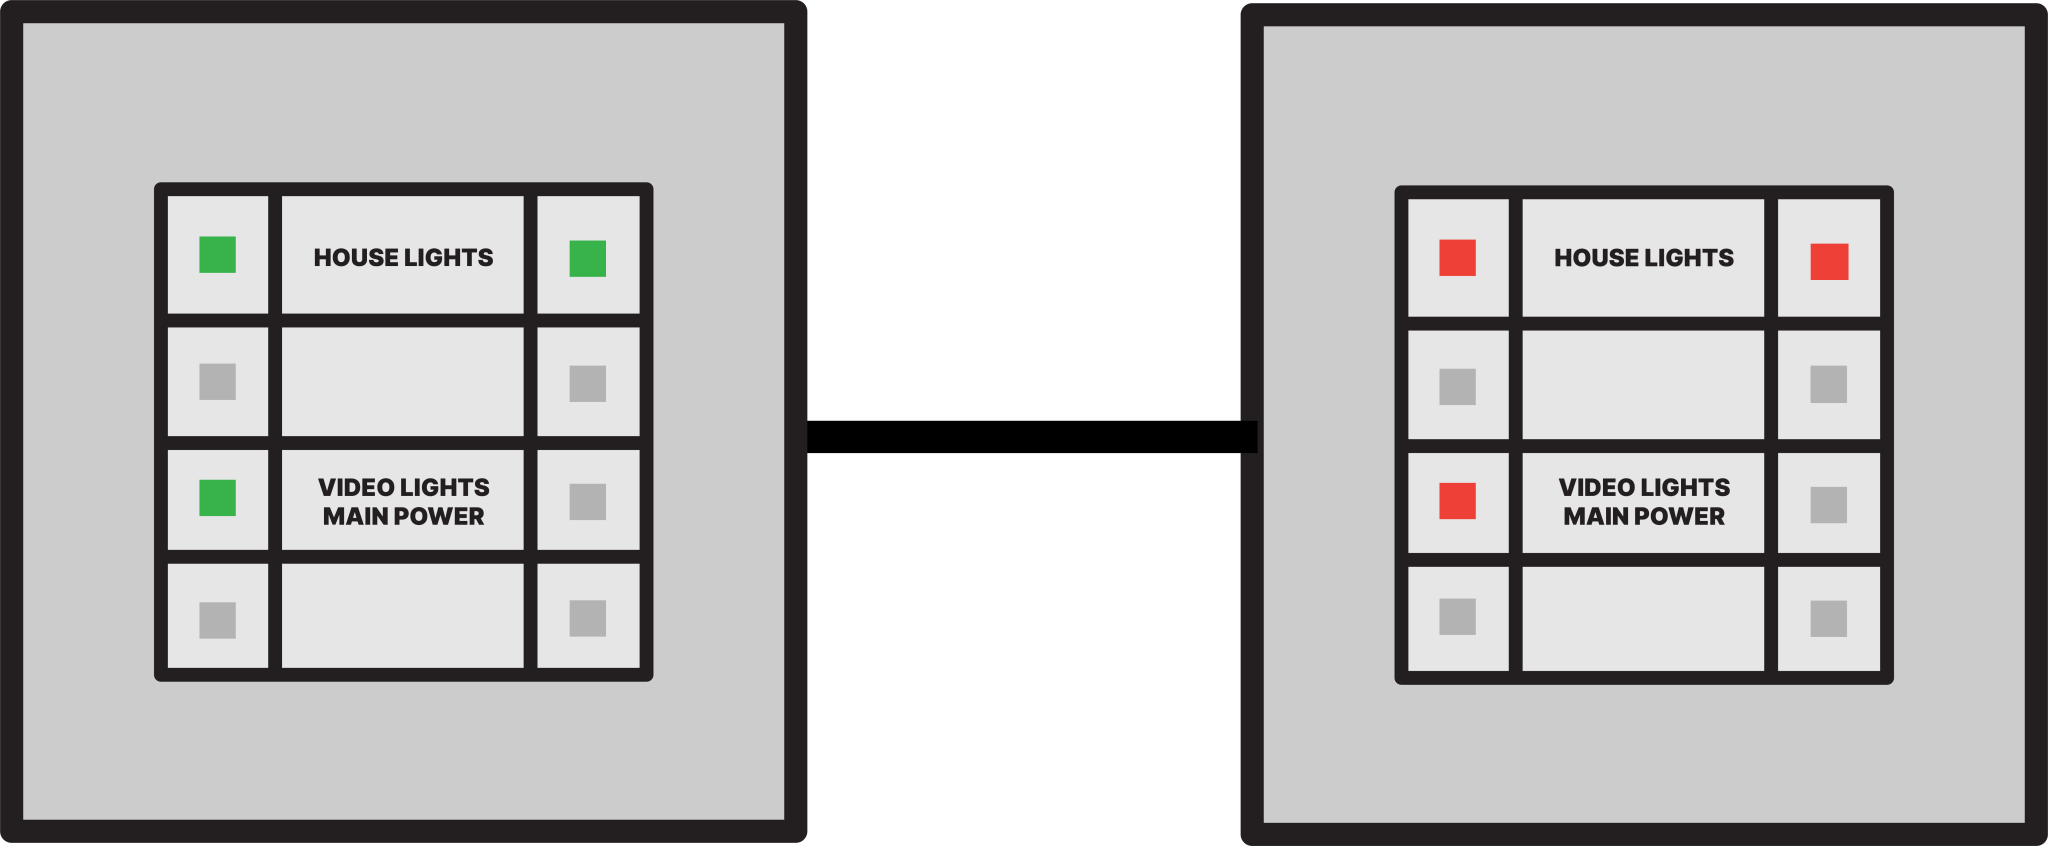
You can control the house lights and turn on the power to the production lights from the switch next to either door to the space. Production lights only get electricity from this button, they are controlled from another place.
The lights embedded in the buttons show the setting of the button. Green is not active and red is active. So if the House Light button is green, the lights are off.
Next log in to the computer using your Aalto credentials.
There is a control screen on the desk next to the main computer monitor. Turn on Self-service mode for Teaching Studio by pressing the stand-by button on the control touch screen next to the main computer. If the screen is black, you can touch it to wake it up.
There are also two front monitors in front of the stage which might be turned off. You can turn them on with the Monitor Remote.
Teleprompters display and the talent monitor in front of the teleprompter could also be turned off. They both have only physical power buttons located on the frame of the monitor and clearly marked.
The camera can be set to standby mode and powered up with the remote. If you don’t see a picture on the talent monitor on the teleprompter, try pressing the green button on the camera remote. You can adjust the pan, tilt and zoom of the camera inside the prompter using the Camera Remote. You do not need to worry about the microphone, it is always on and ready to go.
Now you have everything powered up and you are ready to adjust the studio to accommodate your project.
Teaching Studio imagine routing 101
The Mac Studio computer is the only controllable image source for all the display surfaces in the studio. Additionally, there are a couple of pre-set still images saved into the system if you should need them. You can control the images via the touch screen control panel next to the
computer monitor.
There is one monitor on the control desk, that always displays image from the main monitor – in Mac this means that this monitor has the dock and the top bar visible. There are two more displays coming out of the Mac, but they go straight into the studio’s audiovisual routing system. This means that they are visible only when actually routed to a display surface.
When freshly started up, Computer Display is routed to all routable screens. You see the computer display mirrored everywhere.
There are five different display surfaces in the studio to which any of the three computer displays may be routed:
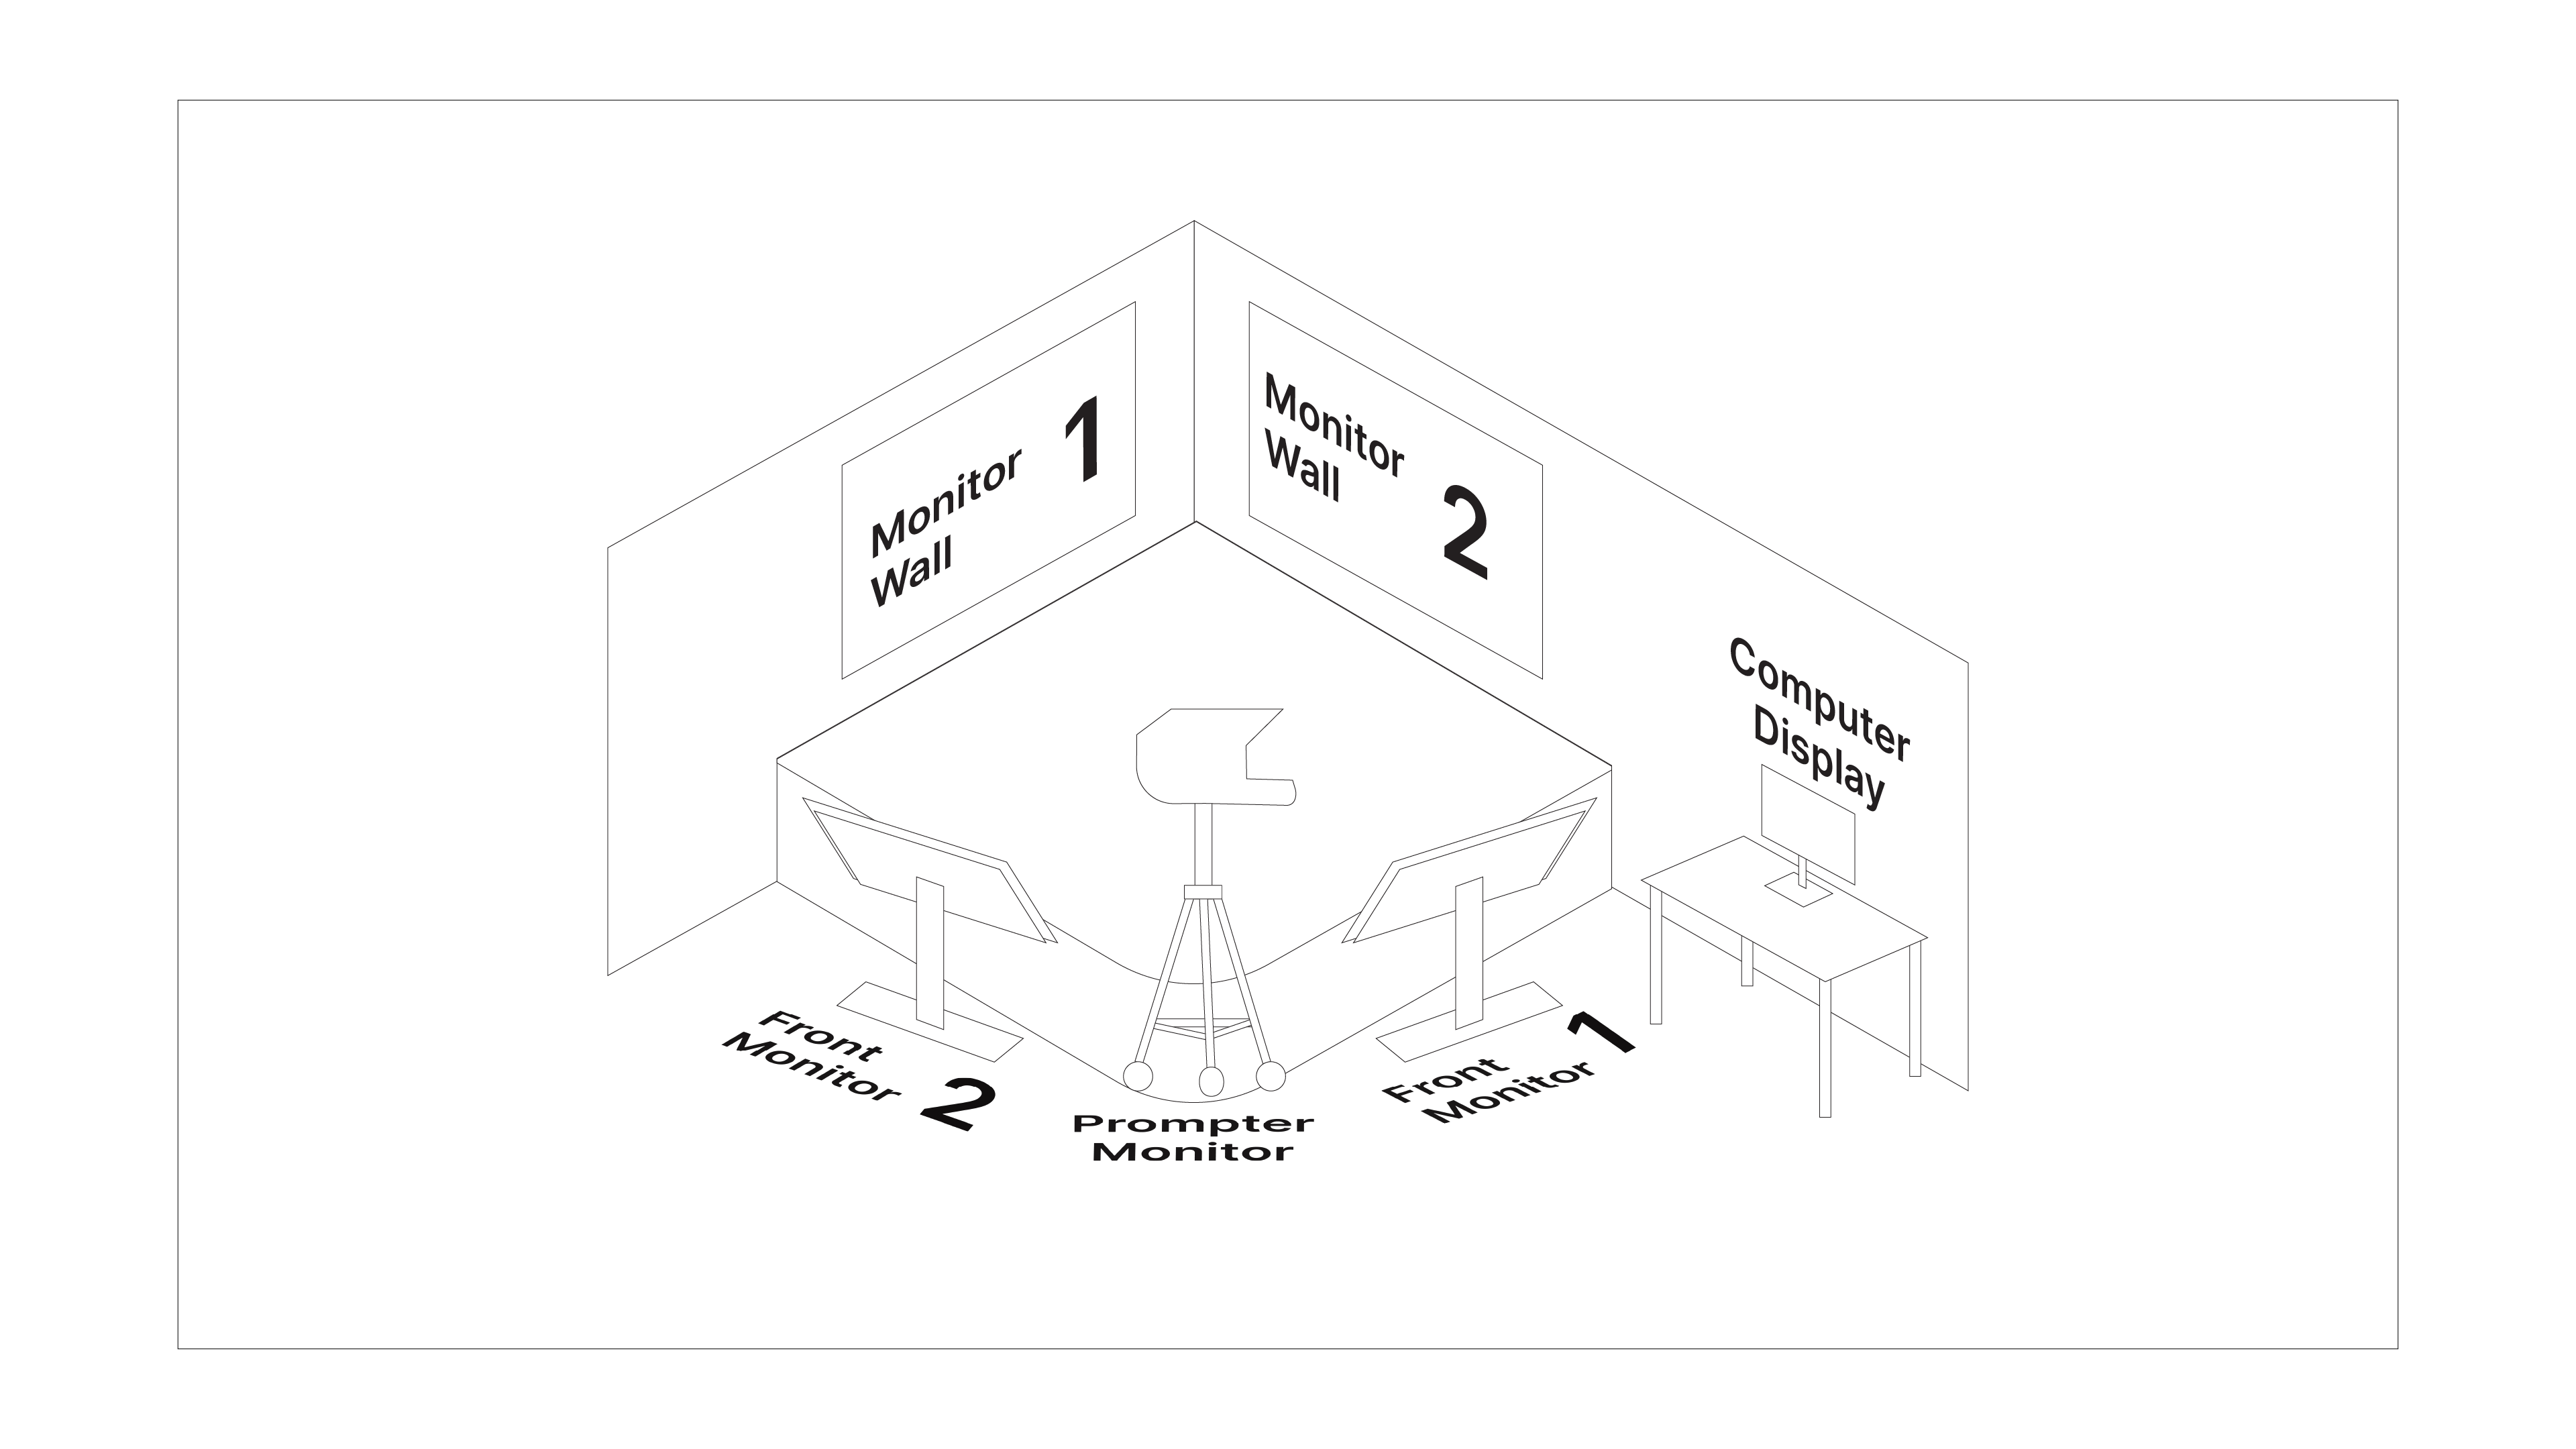
- Monitor Wall 1
- Monitor Wall 2
- Front Monitor 1
- Front Monitor 2
- Teleprompter
Computer Display on the desk is designed to always show the main display of the computer. There is an additional talent monitor in front of the teleprompter. This always displays the picture straight from the camera. If this bothers you, you don’t have to use it.
Control Screen
This is the default view in the control screen after booting up.
This view is the main operation interface when selecting what you wish to show and where. In the bottom you have three icons: Computer, Light Bulb and Display. With these you select what area in the Studio you control. The default is the computer one, this is where we route images. The second one is where you find all the lighting presets and the third one is turning off and on the video walls if needed. The last two are quite self-explanatory, but let’s go through the first page in detail.
Starting again from the lower part on the first page. Above the three icons are six selectable buttons, Prompter, Monitor Wall #1, Monitor Wall #2, Front Monitor #1, Front Monitor #2 and Still Select. These (except for the Still Select) are the destinations, the display surfaces to which you
want to send a certain image feed.
Finally the large grey area is displaying the sources available to be shown in the destination selected at the moment. The default is Monitor Wall #1, but if we select Prompter instead, you’ll see fewer available sources there.
In a nutshell: first select destination, then select source.
How to get imagine from the Mac to the video walls
To see the two extra computer displays, first select Monitor Wall #1 and route HDMI 3 there, then select Monitor Wall #2 and route HDMI 2 there. Now you have all the displays from the Mac showing, and you can drag windows straight from one display to another – going out from the left side of the Computer monitor and coming in from the right side of Monitor Wall #2 – and the same from Monitor Wall #2 to Monitor Wall #1.
Of course, you can route the displays in which way ever is the best for the thing you are doing. As a rule of thumb, it’s good to keep the front monitors as well as the teleprompter as the same as
the main computer monitor, which is how it is by default. Since at least when using PowerPoint, the presenter view is on the main monitor, so this is handy to see in the front monitors or in the teleprompter.
You can route the same source to multiple destinations. For example if PowerPoint presentation is full screen on Monitor Wall #2, but Monitor Wall #1 is showing an empty desktop, you can just route the same HDMI Input selected to Wall #2 to be the input for Wall #1 as well, and now you’ll see the full screen presentation on both monitor walls.
How to record locally via OBS Studio
OBS (Open Broadcaster Software) is good streaming and recording software. You can do a lot more than just streaming and/or recording, but those functionalities are beyond the scope of these instructions.
Here we look at how to set up OBS for a good quality local recording.
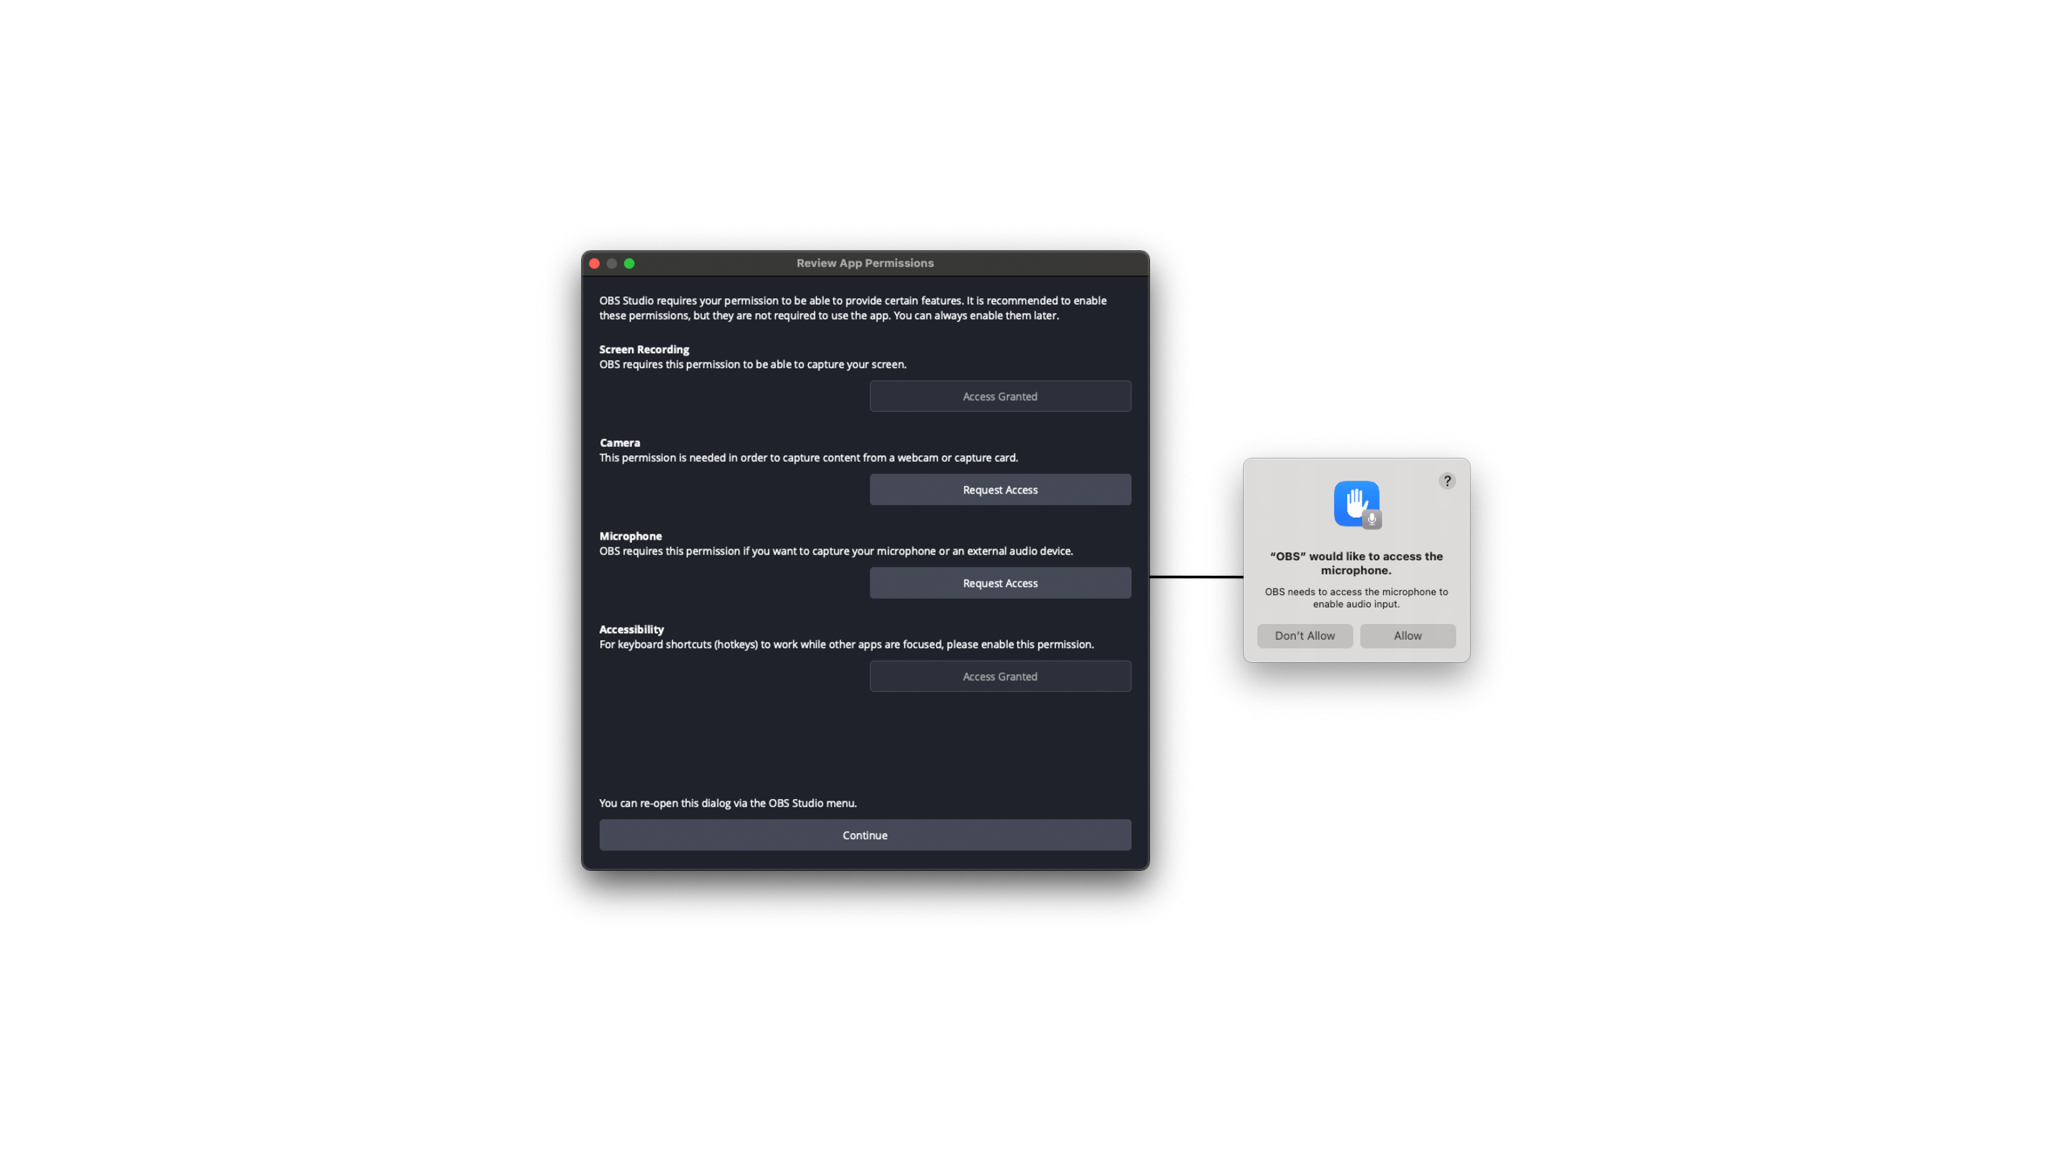
First, when opening the software, you need to grant permissions to OBS to use the camera and microphone.
When the program is starting up it will ask you for those permissions
with this dialogue. When you click on Request Access, a pop up from
the operating system will appear asking if you allow OBS to access
camera and microphone respectively.
When access is granted OBS is able to receive audio from the
microphone and video from the camera in the studio.
After giving permissions OBS will ask if you want to optimize for streaming or local recording. We want to set things up manually, so cancel that dialog. Next you will be greeted by the main window of OBS.
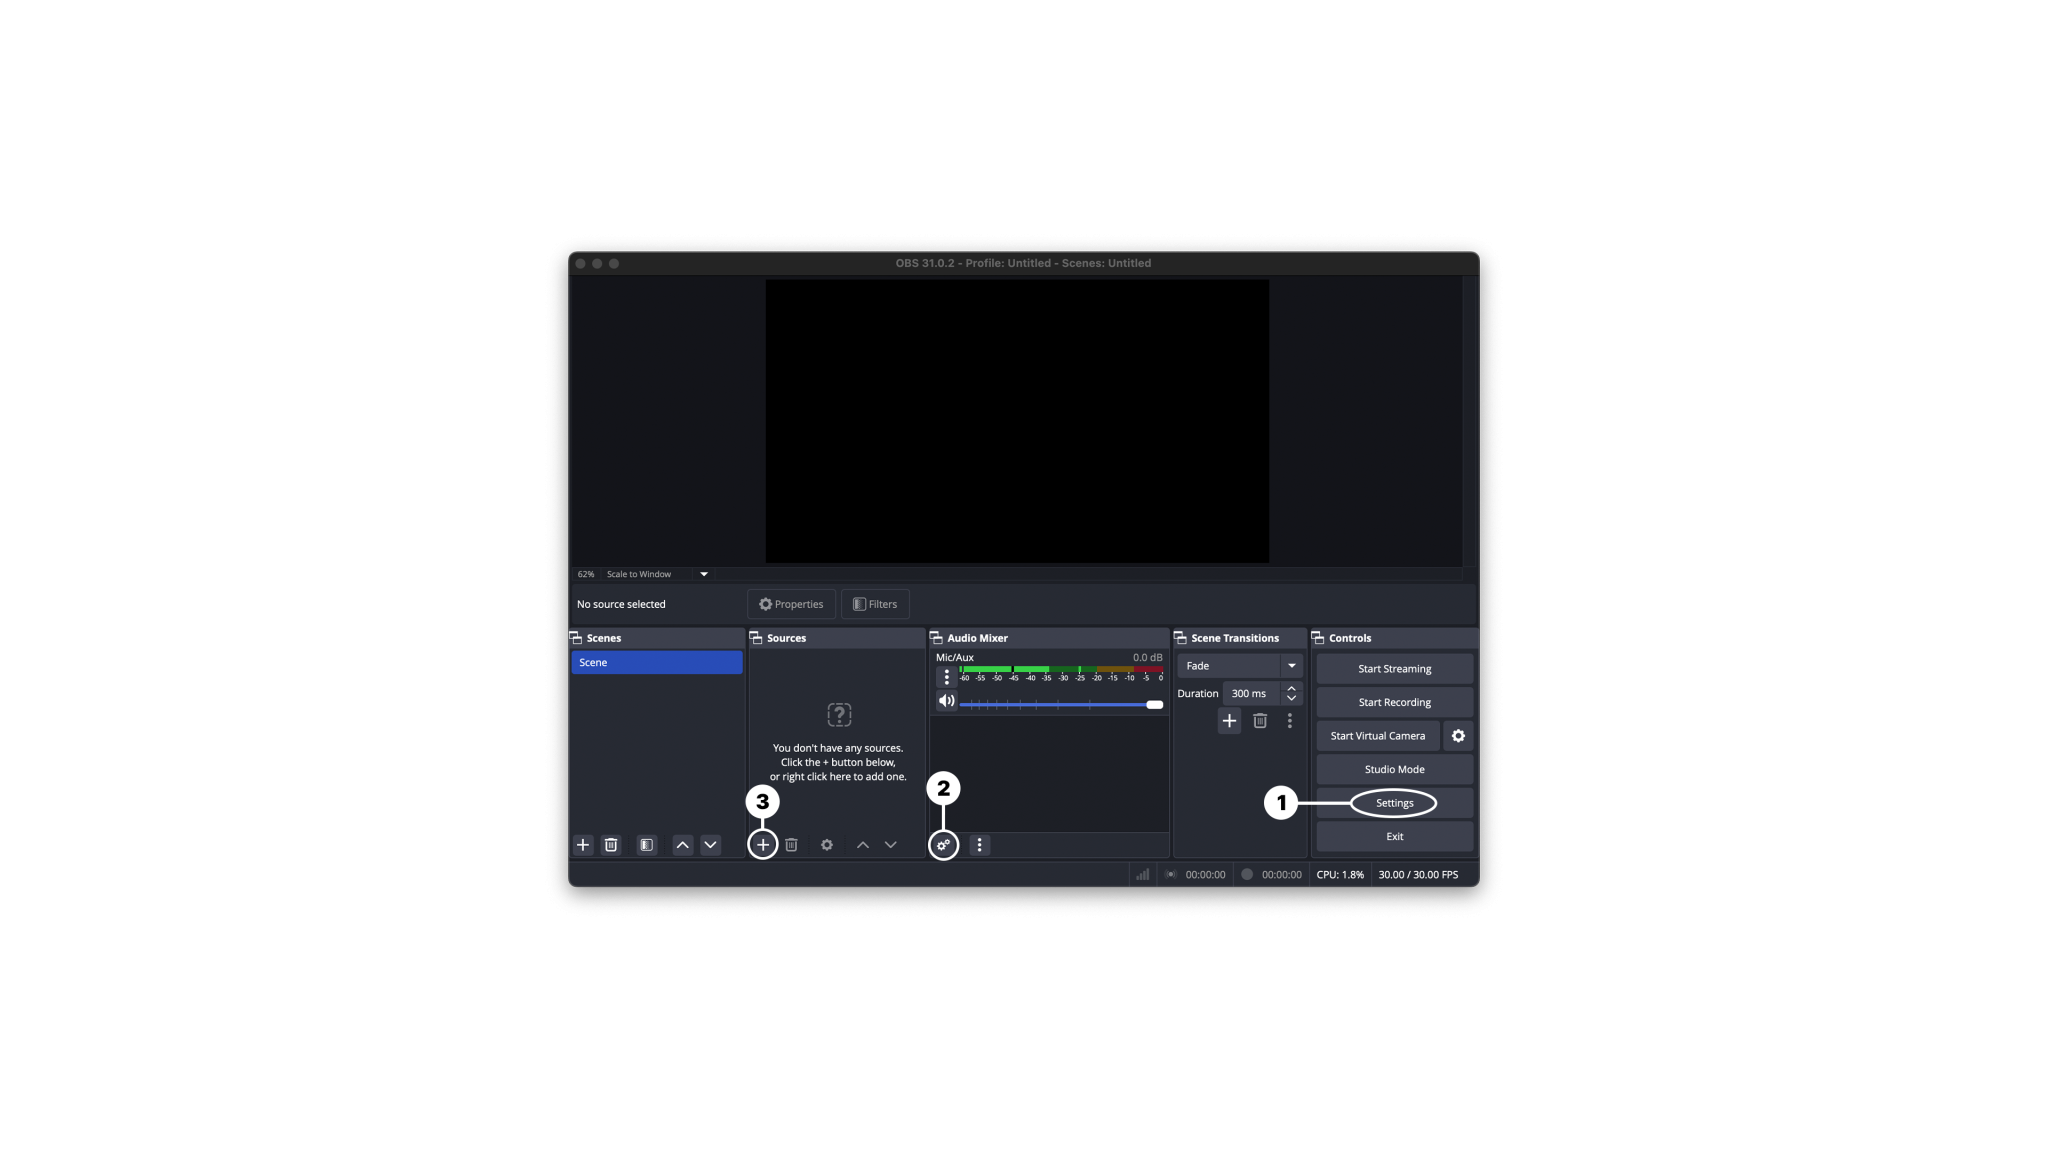
3 Steps
There are 3 steps that need to be set up before pressing the “Start Recording” button.
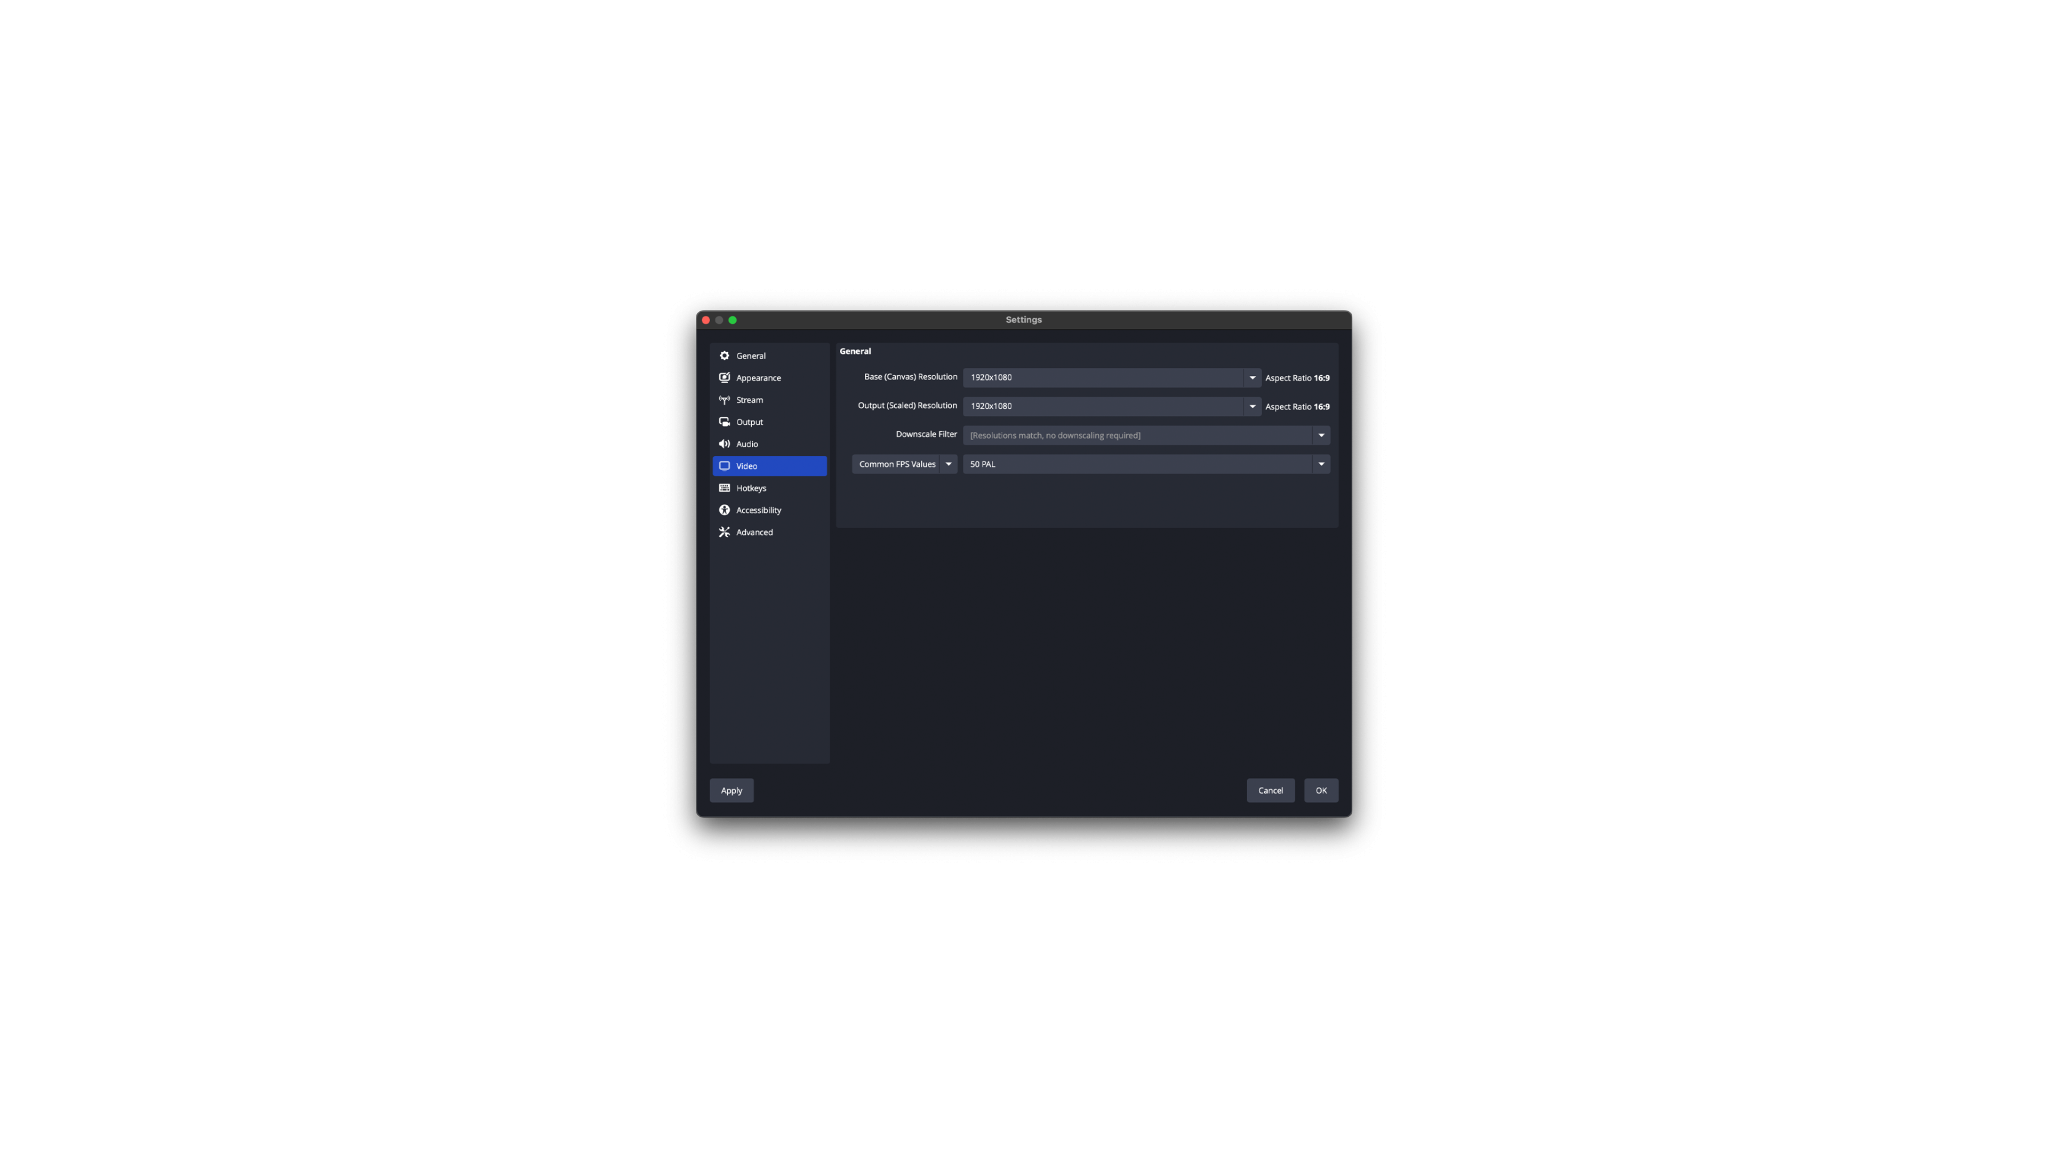
First, let’s set up the recording settings, so that the recorded video is a Full HD video with a proper 50 frames per second framerate. Click on Settings.
Open the Video page in Settings. There, select 1920×1080 to both Base and Output Resolutions, and 50 PAL to the Common FPS Value. Now your video will be a good quality Full HD video. Click OK. You’ll see the values
update in the lower right corner of the screen to be 50.00 / 50.00 FPS.
Next to the second part. OBS is showing only one audio channel from
the microphone. This will result you hearing audio only from the left
channel. This is because the microphone is outputting only one
channel, so we need to let OBS know not to expect a stereo signal here.
Click on the cogwheel icon in circle number two.
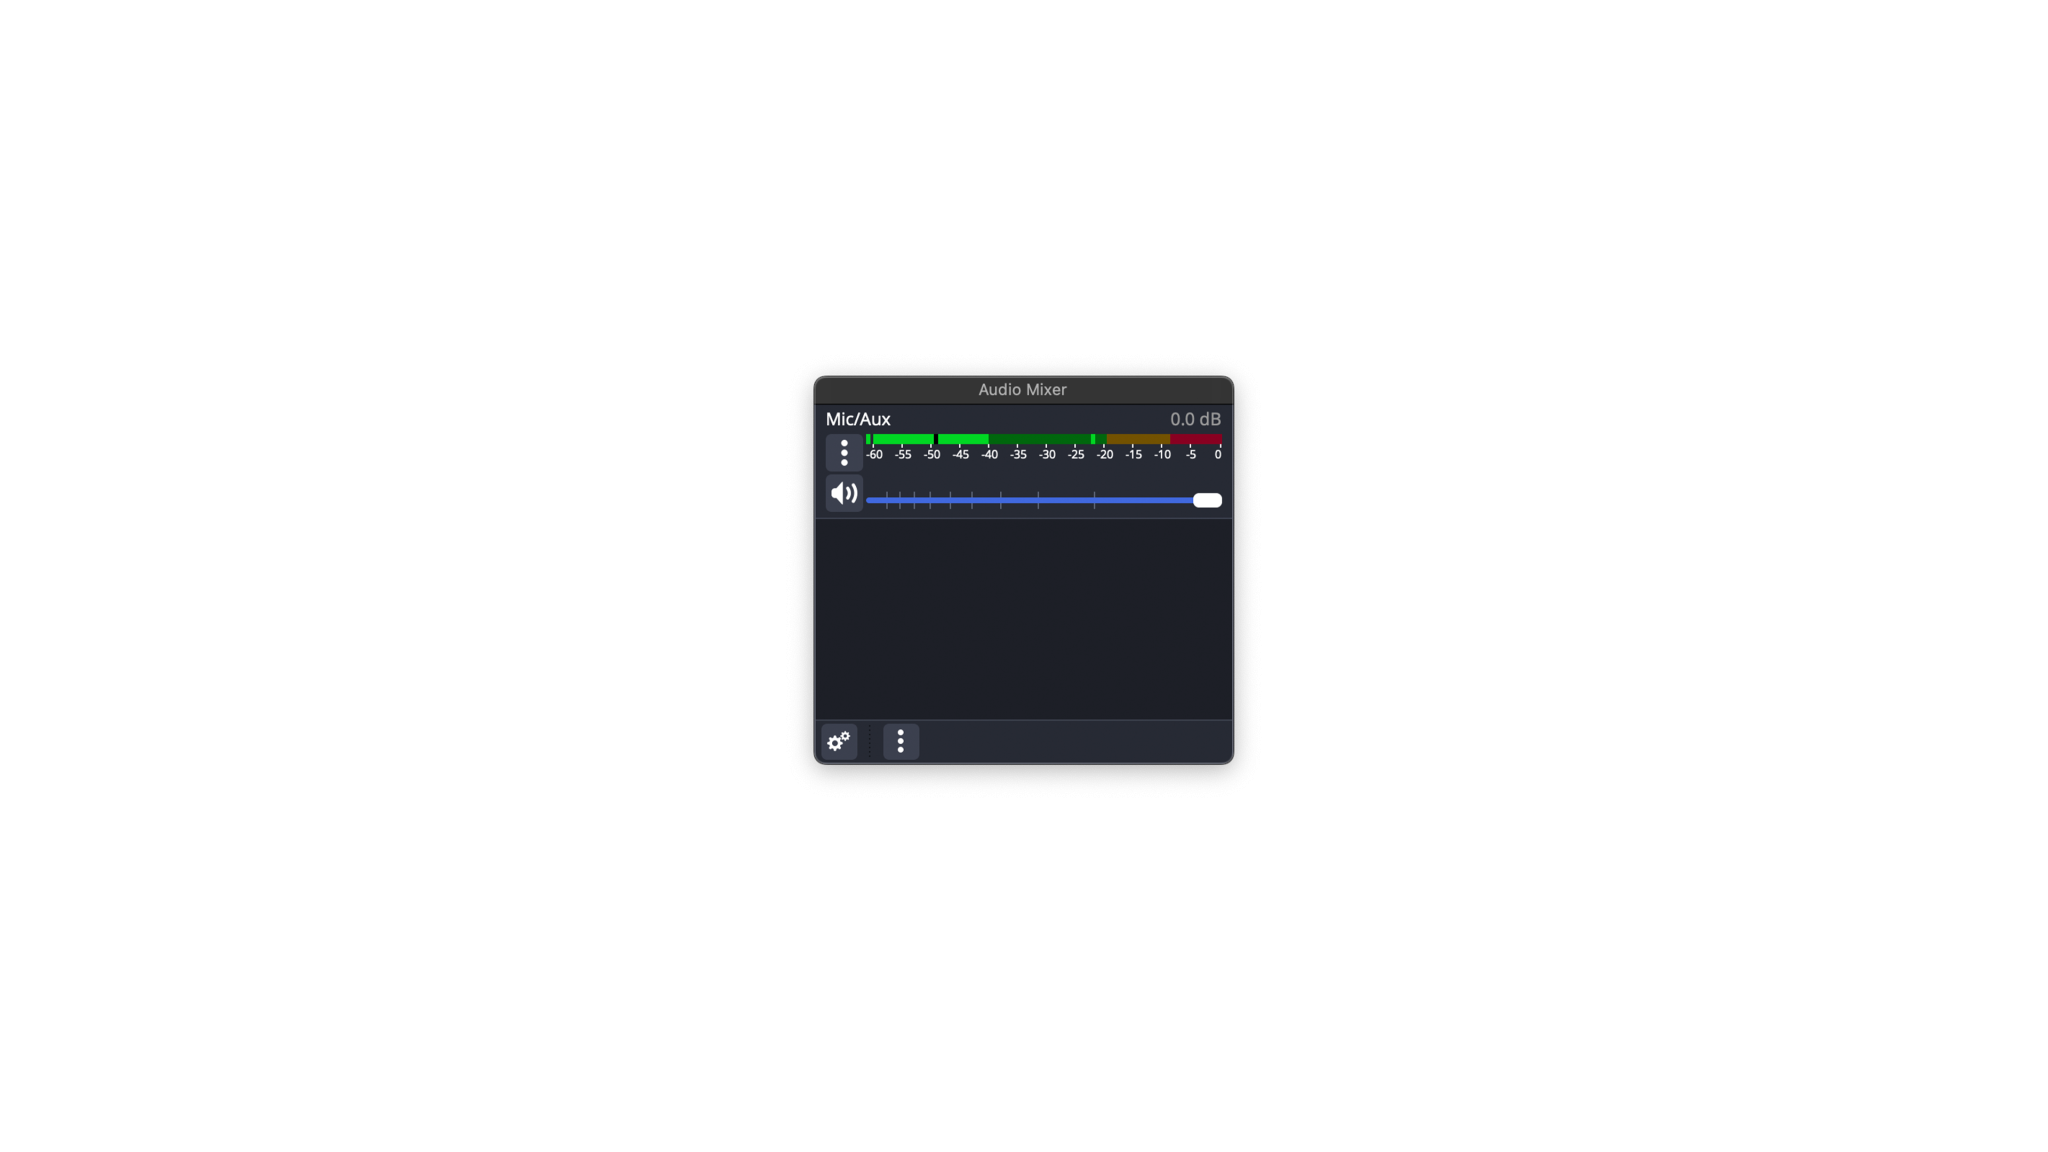
Here, click on the Mono selection checkbox. Now OBS will record the microphone to both, left and right channels. Click Close, and now you’ll see audio levels jumping in both channels.
The last thing to do is to bring in the picture from the teleprompter camera. Click on the plus button in circle 3 and select “Capture Card Device”.
A couple of selections are needed, but they are very simple.
- Select CAMERA_IN from the Device drop down menu.
- Next select correct Input format, the one starting YUY2.
- Select resolution, 1920×1080.
- Lastly, select 50 FPS as the frame rate. This is all you need to do to
bring the camera inside the teleprompter to the OBS. If you don’t see the image from the camera but colour bars for example, check with the remote that the camera is powered on.
Now you’re all set and you just need to hit the Start Recording button
and recording starts. Remember to push the Stop Recording button
when it is finished. The recorded files are saved to your user account’s Movies-folder by default. You can find a shortcut to this folder from the dock of the Mac.
Remember to transfer your files to a safe location before logging out. The files will be deleted once you log out.
After recording, before leaving
There are a couple of things to do before leaving the space:
- Turn on the house lights from the switch next to the door.
- Ensure you have transferred all your files to a safe place.
- Log out from the computer. No need to shut down, just log out.
- Turn off the front monitors with the appropriate remote control.
- Set the camera to standby mode with the camera remote control.
- Place remote controls and clicker to their respective places on the computer desk.
- Turn off the main teleprompter display as well as the talent monitor.
- Shut down the self-service production mode from the touch screen.
Troubleshooting
If the studio isn’t co-operating, we have a troubleshooting checklist with quick fixes to some known issues.
